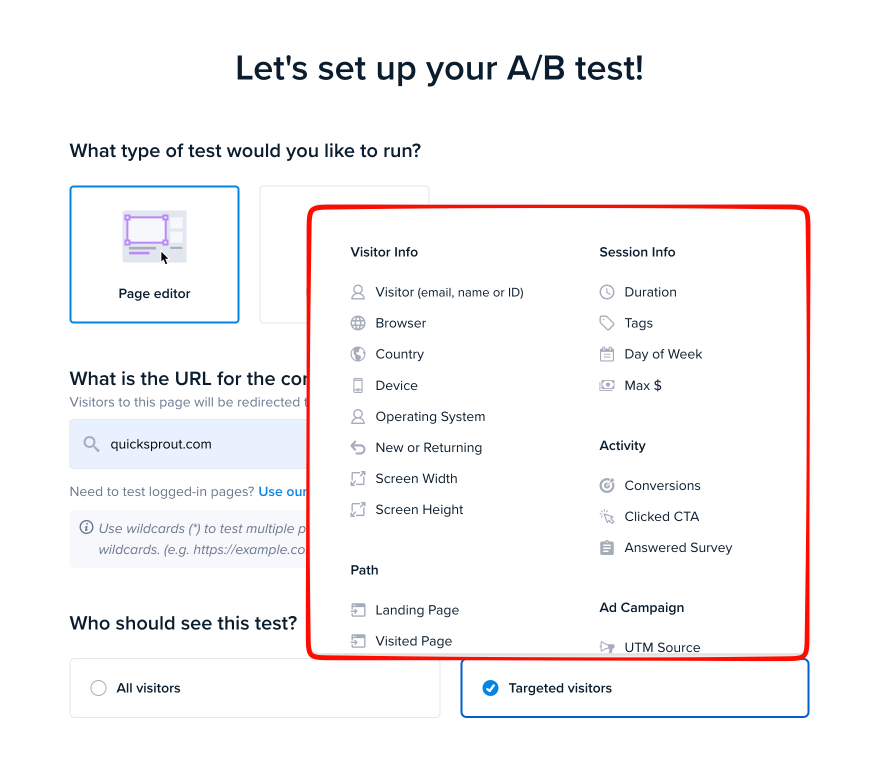
Audience Targeting lets you choose who is eligible to see your A/B Test. Instead of showing a test to everyone who visits the test URL, you can target a specific group of visitors based on things like device type, country, browser, referrer, UTM campaign, pages visited, or actions taken during the session.
This is useful when your test is meant for a specific audience, such as mobile visitors, visitors from a certain country, or people arriving from a campaign.
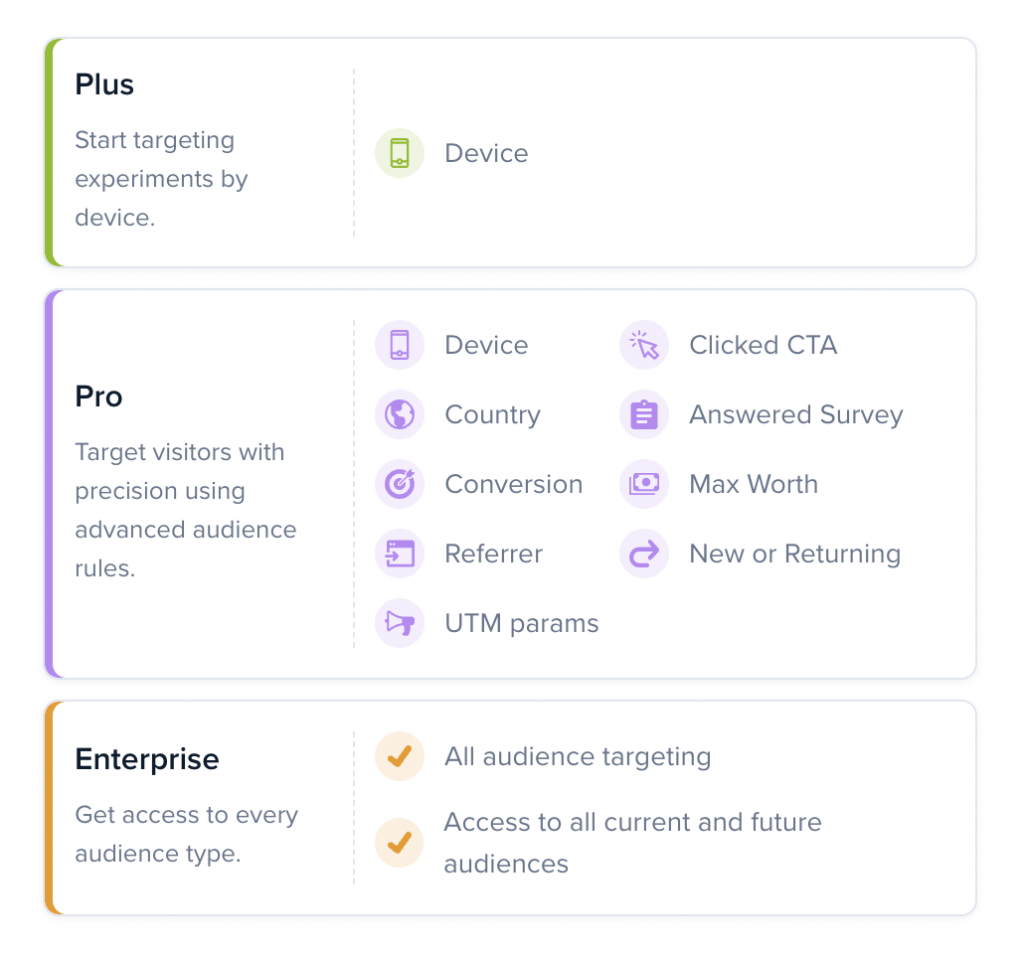
Some targeting options depend on your Crazy Egg plan. If an option is locked or marked with a crown, it is not included in your current plan. Click the option to view upgrade information.
How Audience Targeting Works
Audience Targeting is session-based.
Once a visitor matches your audience conditions, they stay in that audience for the rest of their session. This helps keep the visitor’s experience consistent while they move through your site.
For example:
- If a visitor matches based on country, device, or browser, they remain matched for the session.
- If a visitor visits a certain page, answers a survey, clicks a CTA, or completes a conversion, they can become matched later in the session.
- Once they match, they stay matched until the session ends.
- When they return in a new session, Crazy Egg checks the audience conditions again.
Audience Targeting vs. Test URL
Audience Targeting controls who can see the test.
The A/B Test URL controls where the test can run.
A visitor must match both requirements before they can see the test:
Example: If your test runs on /pricing and targets visitors who previously visited /features, the visitor must first visit /features and then later visit /pricing to see the test.
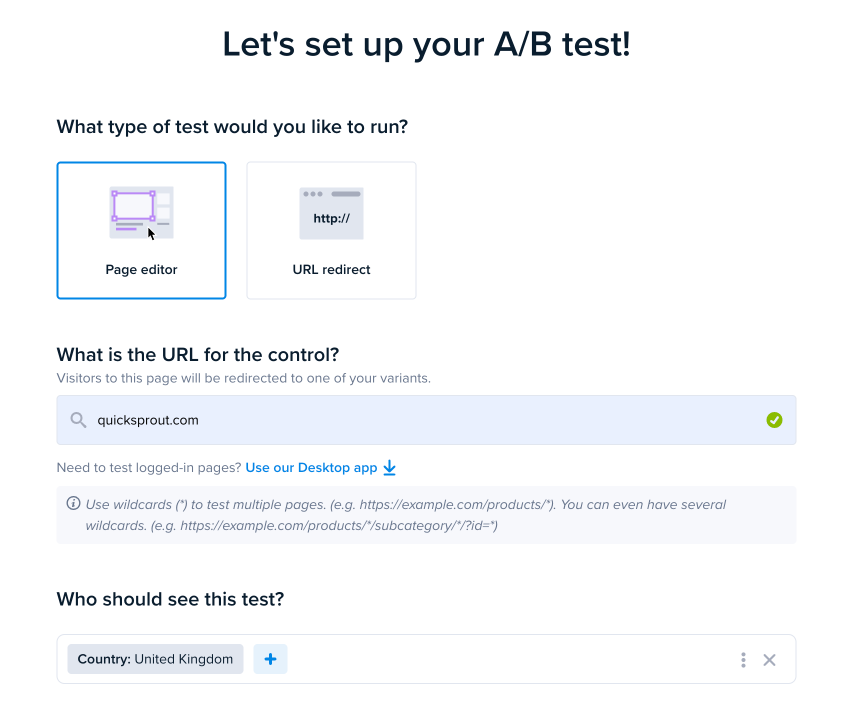
Creating an Audience Targeted A/B Test – Step by Step
Here is a recommended process to help you get started.
Congratulations! Your A/B Test is now targeted to the audience you selected.
Where Audience Targeting Appears
After you create an audience-targeted test, the selected audience will appear in your A/B Testing dashboard.
For example, instead of showing Everyone, the test may show an audience such as:
- Country
- Desktop
- Device
- Country + Desktop
You can also view the audience details in the A/B Test Results area. Open the test details tooltip to see which audience was used for the test.
UTM Targeting
UTM targeting is based on the visitor’s first page view in the session.
If the visitor lands on a URL with a matching UTM parameter, they match that audience for the rest of the session.
Example:
A visitor lands on:
https://example.com/?utm_source=newsletter
If your audience targets utm_source=newsletter, that visitor matches the audience for the session.
If they later visit another page without the UTM parameter, they still remain matched.
Important: UTM parameters are only checked on the first page view of the visitor’s session. If the visitor first lands on a page without UTM parameters and then reaches a UTM-tagged URL later in the same session, they will not match the UTM audience.
Referrer Targeting
Referrer targeting uses the visitor’s first referrer in the session.
For example, if a visitor first arrives from a search engine, partner website, social network, or campaign link, that first referrer is used for audience matching.
The referrer does not change as the visitor moves through your site during that session.
Conditions That Stay the Same During a Session
Some audience conditions are stable during the visitor’s session.
These include:
- Country
- Device
- Browser
- Operating system
- Landing page
- First referrer
- UTM parameters from the landing page
If a visitor matches one of these conditions, they stay matched for the rest of the session.
Conditions That Can Become True Later
Some audience conditions can become true after the visitor has already started browsing your site.
These include:
- Visited a page
- Answered a survey
- Clicked a CTA
- Completed a conversion
- Reached a certain session duration
- Viewed a certain number of pages
Once one of these conditions becomes true, the visitor remains matched for the rest of the session.
A Note About “Less Than” Conditions
Be careful when using conditions such as:
- Pages viewed is less than 3
- Session duration is less than 60 seconds
These conditions are usually true at the beginning of a session.
Because visitors stay matched after they qualify, they may remain in the audience even after they view more pages or spend more time on your site.
For this reason, “less than” conditions are usually better for analysis or filtering, not for targeting an A/B Test that should stop showing later in the session.
Best Practices
Use Audience Targeting when the audience is important to your test hypothesis.
Use the A/B Test URL settings to control where the test appears.
Use Audience Targeting to control who is eligible to see the test.
For UTM-based tests, make sure your campaign links include UTM parameters on the landing page URL.
Avoid audiences that are too narrow unless your site has enough traffic for the test to collect meaningful data.
Troubleshooting
UTM parameters added later in the session will not qualify the visitor for that audience.
Audience Targeting controls who is eligible to see the test. The test URL controls where the test activates.
Once a visitor matches an audience, they stay matched for the rest of the session. This keeps the test experience consistent.
Summary
Audience Targeting is session-based. Once a visitor matches an audience, they remain matched for the rest of that session. UTM and referrer targeting are based on the first page view of the session. The A/B Test still only appears on the URLs configured in the test setup.
| Audience Segment | Plus | Pro | Enterprise |
|---|---|---|---|
| Device Type | ✅ | ✅ | ✅ |
| Country | ✅ | ✅ | |
| New or Returning | ✅ | ✅ | |
| Referrer | ✅ | ✅ | |
| UTM Source | ✅ | ✅ | |
| UTM Medium | ✅ | ✅ | |
| UTM Term | ✅ | ✅ | |
| UTM Content | ✅ | ✅ | |
| UTM Campaign | ✅ | ✅ | |
| Previous Conversions | ✅ | ✅ | |
| Clicked CTA | ✅ | ✅ | |
| Answered Survey | ✅ | ✅ | |
| Customer Value ($) | ✅ | ✅ | |
| Identified Visitor (email, name, or ID) | ✅ | ||
| Browser | ✅ | ||
| Operating System | ✅ | ||
| Screen Width | ✅ | ||
| Screen Height | ✅ | ||
| Landing Page | ✅ | ||
| Visited Page | ✅ | ||
| No. of Pages Viewed | ✅ | ||
| Session Duration | ✅ | ||
| Tags | ✅ | ||
| Day of Week | ✅ |